Shopifyの商品をGatsbyサイトで表示する方法

こんにちは、筋肉めがねです。
GatsbyでE-commerceサイトを作成するシリーズの記事、第五弾です。
本日は、Shopifyの商品をGatsbyサイトで表示する方法です。
商品の一覧を表示するページを作る
先ずは、商品の一覧を表示するページを作ります。
src/pagesの直下に「product.jsx」を作ります。
import kebabCase from 'lodash/kebabCase'
import React from "react"
import { Link, graphql } from "gatsby"
import Helmet from 'react-helmet'
import Layout from '../components/Layout'
import Sidebar from '../components/Sidebar'

//このscssを次に作ります。
import '../../src/assets/scss/pages/_products.scss'

class ProductsPage extends React.Component {
    render() {
        const edges = this.props.data.allShopifyProduct.edges
        const { title } = this.props.data.site.siteMetadata

        return (
            <Layout>
              <div>
                <Helmet title={`All Produtcs - ${title}`} />
                <div className="content">
                  <div className="content__inner">
                    <div className="page">
                      <h1 className="page__title">Products</h1>
                      <div className="page__body">
                        <div className="products">
                          <ul className="products__list">

                            {edges.map(({ node }) => (
                                <li key={node.shopifyId}>
                                <h3>
                                    <Link className="products__title" to={`/products/${kebabCase(node.handle)}`}>
                                      {node.title}
                                    </Link>
                                    <Link className="products__title" to={`/products/${kebabCase(node.handle)}`}>
                                      {" - "}€{node.priceRange.minVariantPrice.amount}
                                    </Link>
                                </h3>
                                <Link className="products__title" to={`/products/${kebabCase(node.handle)}`}>
                                  <img src={node.images[0].originalSrc} alt={node.handle} />
                                </Link>
                                </li>
                            ))}
                          </ul>
                        </div>
                      </div>
                    </div>
                  </div>
                </div>
                <Sidebar {...this.props} />
              </div>
            </Layout>
        )
    }
}

export default ProductsPage

export const pageQuery = graphql`
  {
    allShopifyProduct(sort: { fields: [title] }) {
      edges {
        node {
          title
          shopifyId
          description
          handle
          images {
            originalSrc
          }
          priceRange {
            minVariantPrice {
              amount
            }
          }
        }
      }
    }
    site {
        siteMetadata {
          title
          subtitle
          copyright
          menu {
            label
            path
          }
          author {
            name
            email
            telegram
            twitter
            github
            rss
            vk
          }
        }
      }
  }
`
このページがgatsby-node.jsの以下の部分で読み込まれ、gatsbytutorial/productsのページを作ってくれます。
...
  _.each(result.data.allMarkdownRemark.edges, edge => {
    if (_.get(edge, 'node.frontmatter.layout') === 'page') {
      createPage({
        path: edge.node.fields.slug,
        component: slash(pageTemplate),
        context: { slug: edge.node.fields.slug },
      })
    } else if (_.get(edge, 'node.frontmatter.layout') === 'post') {
...
商品一覧のページ用に、scssも準備しておきます。
ファイルを作る場所に注意してくださいね。
@import "../variables";
@import "../mixins";

.products {
  &__list {
    list-style-type: none;
    padding-left:0;
    &-item {
      &-link {
        color: $color-base;
        &:hover,
        &:focus {
          color: $color-primary;
          border-bottom: 1px solid $color-primary;
        }
      }
    }
  }
  &__title{
    font-size: 1.475rem !important;
    text-align: left !important;
    color: #494949;
    line-height: 2.275rem !important;
    font-weight: 600;
  }
}
商品の一覧を作成するページ自体はこれで良いのですが、一覧にある各商品へのリンクが未だ動きません。
gatsby-node.jsでゴニョゴニョしてあげる必要があります。
gatsby-node.jsについては、後ほど設定します。
個別の商品を表示するページを作る
次に、個別の商品詳細ページを作っていきます。
他のテンプレートファイルと同様に、先ずはgatsbytutorial/src/templates直下に「product-template.jsx」ファイルを作ります。
import React from "react"
import Helmet from 'react-helmet'
import { graphql } from "gatsby"
import Layout from "../components/Layout"

//ProductTemplateDetailsは、この後作成します。
import ProductTemplateDetails from '../components/ProductTemplateDetails'

class ProductTemplate extends React.Component {
  render(){

    //pageContextを読み込むときは、波括弧{}が必要です。
    const { product } = this.props.pageContext
    return (
      <Layout>
        <div>
          <Helmet>
            <title>{product.title}</title>
            <meta name="description" content={product.description} />
          </Helmet>
          <ProductTemplateDetails {...this.props} />
        </div>
      </Layout>
    )
  }
}

export default ProductTemplate

export const pageQuery = graphql`
  {
    allShopifyProduct {
      edges {
        node {
          title
          shopifyId
          description
          handle
          images {
            originalSrc
          }
          priceRange {
            minVariantPrice {
              amount
            }
          }
        }
      }
    }
    site {
      siteMetadata {
        title
        subtitle
        copyright
        menu {
          label
          path
        }
        author {
          name
          twitter
        }
        disqusShortname
        url
      }
    }
  }
`
そして、ProductTemplateDetailsコンポーネントを作成します。
import React from 'react'
import Sidebar from '../Sidebar'
//scssはこの後作ります。
import './style.scss'

class ProductTemplateDetails extends React.Component {
  render() {

    const { product } = this.props.pageContext

    return (
      <div>
        <div className="content">
          <div className="content__inner">
            <div>
              <h2 className="productDetail_title">{product.title}</h2>
              €{product.priceRange.minVariantPrice.amount}
              <div className="productDetail_description">{product.description}</div>
              <img src={product.images[0].originalSrc} alt={product.handle} />
            </div>
          </div>
        </div>
        <Sidebar {...this.props} />
      </div>
    )
  }
}

export default ProductTemplateDetails
scssも準備します。
.productDetail{
  &_title{
    font-size: 1.475rem !important;
    text-align: left !important;
    color: #494949;
    line-height: 2.275rem !important;
    font-weight: 600;
  }

  &_description{
    margin-bottom:10px;
  }
}
以上で商品リストページ、個別商品ページの準備はオーケーです。
gatsby-node.jsファイルの更新
それでは、gatsby-node.jsファイルを更新していきます。
const _ = require('lodash')
...

exports.createPages = ({ graphql, actions }) => {
  const { createPage } = actions

  return new Promise((resolve, reject) => {
    const postTemplate = path.resolve('./src/templates/post-template.jsx')
    ...
    ...

    //ここで、Product-templateを読み込みます。
    const productTemplate = path.resolve(`./src/templates/product-template.jsx`)

      graphql(`
        {
          allMarkdownRemark(
          ...
          )

          #ここでShopifyから引っ張ってくるデータを読み込みましょう。

          allShopifyProduct(sort: { fields: [title] }) {
            edges {
              node {
                title
                images {
                  originalSrc
                }
                shopifyId
                handle
                description
                availableForSale
                priceRange {
                  maxVariantPrice {
                    amount
                  }
                  minVariantPrice {
                    amount
                  }
                }
              }
            }
          }
        }
      `).then(result => {
        if (result.errors) {
          console.log(result.errors)
          reject(result.errors)
        }
        ...
        ...
        //このあたりは幾つかページを作るコードが書かれているはずです。

        ...
        // 下は月別アーカイブのページを作るコードですね。

        yearMonths.forEach(yearMonth => {
          const [year, month] = yearMonth.split('/')
          const startDate = `${year}-${month}-01T00:00:00.000Z`;
          const newStartDate = new Date(startDate);
          // 月末日を取得
          const endDate = new Date(
            new Date(newStartDate.setMonth(newStartDate.getMonth() + 1)).getTime() -
              1
          ).toISOString();

          createPage({
            path: `/${year}/${month}/`,
            component: periodTemplate,
            context: {
              displayYear: year,
              displayMonth: month,
              periodStartDate: startDate,
              periodEndDate: endDate
            }
          });
        });

        //ここで、個別商品のページを作ります。
        //handleというfieldを使って、個別商品用のパスを作ってくれます。

        result.data.allShopifyProduct.edges.forEach(({ node }) => {
          createPage({
            path: `/product/${node.handle}`,
            component: productTemplate,
            context: {
              product: node,
            },
          })
        })
        ...
        ...
        //これ以下は変更しません。
        ...
これで、gatsby-node.jsの設定は完了です。
ヘッダー、サイドバーにProductを追加する
最後に、商品リストページへのリンクは、ヘッダーおよびサイドバーへ埋め込みます。
先ずは、ヘッダーから編集していきます。
import React from 'react'
import { useStaticQuery, Link, graphql } from 'gatsby'
import './style.scss'

export default function Header () {
    ...
    ...
    return (
        <header id="luxbar" className="luxbar-default">
            <input type="checkbox" className="luxbar-checkbox" id="luxbar-checkbox"/>
            <div className="luxbar-menu luxbar-menu-right luxbar-menu-light">
                <ul className="luxbar-navigation">
                    ...
                    ...
                    {/* Privacyの下にProductsを追加しましょう。*/}
                    <li className="luxbar-item"><a href="/privacy">Privacy</a></li>
                    <li className="luxbar-item"><a href="/product">Product</a></li>
                </ul>
            </div>
        </header>
    )
}
続いてサイドバーです。
サイドバーは、gatsby-config.jsで設定した内容を、Menuコンポーネントで読み込んでいます。
ですので、gatsby-config.jsファイルを編集します。
const lost = require('lost')
const pxtorem = require('postcss-pxtorem')
const url = 'https://gatsbytutorial.de'

//開発環境時に .env.* が読み込めるように `dotenv` を使用
const activeEnv =
  process.env.GATSBY_ACTIVE_ENV || process.env.NODE_ENV || 'development';
require('dotenv').config({
  path: `.env.${activeEnv}`,
});

module.exports = {
  siteMetadata: {
    ...
    menu: [
      ...
      {
        label: 'Privacy policy',
        path: '/privacy/'
      },
      //ここにProductを追加しましょう。
      {
        label: 'Product',
        path: '/product/'
      }
    ],
以上です。
キャッシュをクリアして、開発環境で確認してみましょう。
kinnikumegane@Kinnikus-MacBook-Air tutorial % gatsby clean
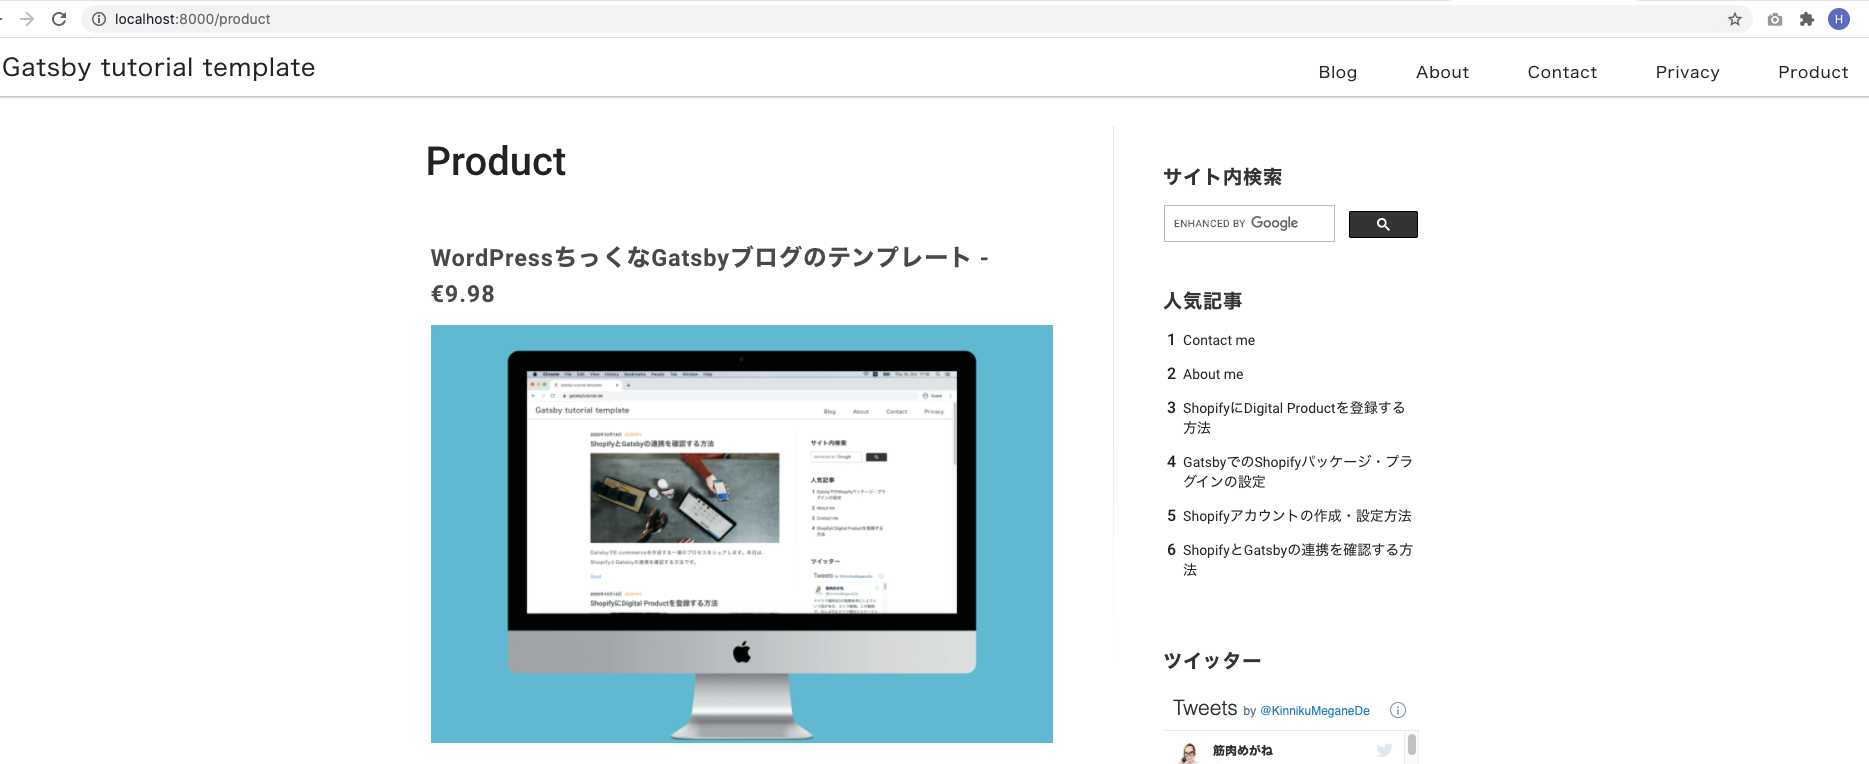
kinnikumegane@Kinnikus-MacBook-Air tutorial % gatsby develop商品の一覧ページはこんな感じですね。
ヘッダーに「Product」が追加されている事も確認できます。
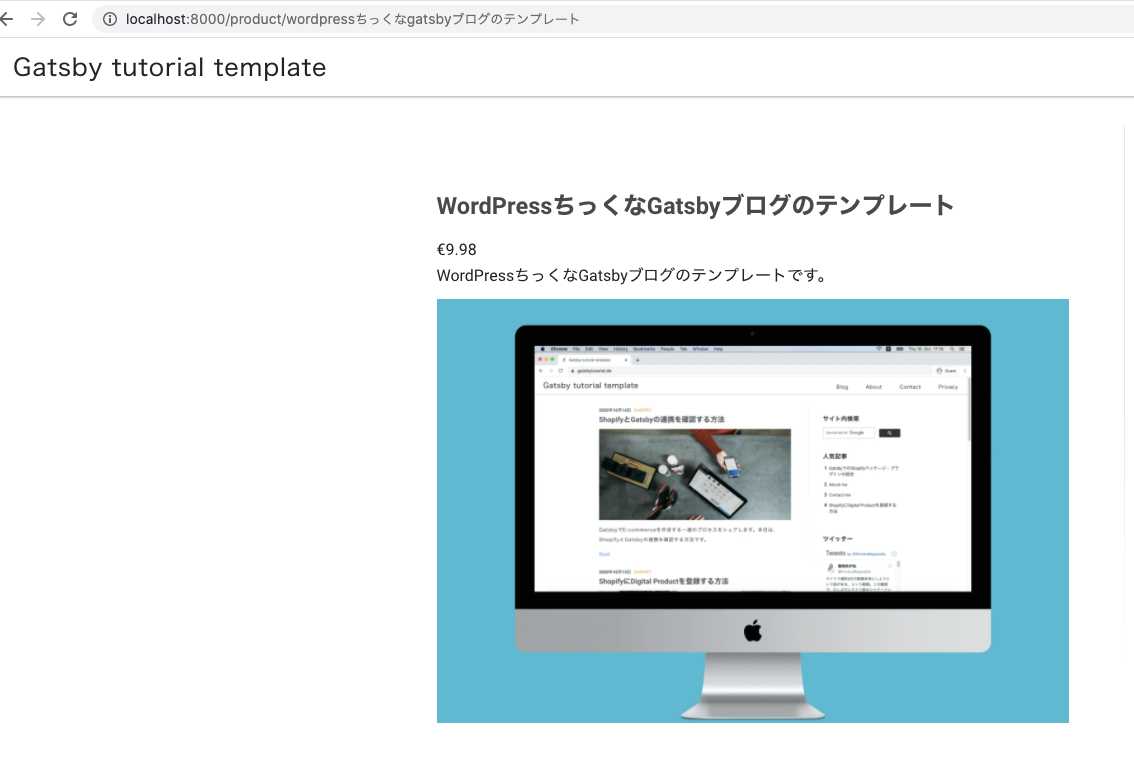
個別商品のページは以下です。Shopifyで設定した商品名がそのままurlとして使われていますね。
最後にサイドバーにも「Product」が追加されている事を確認できました。
以上です。
まとめ
本日は、Shopifyの商品をGatsbyサイトで表示する方法について書きました。
次回は、「shopify-buy」プラグインを使って、チェックアウト機能をGatsbyに実装していきます。