【更新版】Top pageのデザインを変更しました。
10月28日追記
Gatsbyブログについて、初noteを書きました。
【完全版】爆速GatsbyでWordPressちっくなブログを作る全手順
こんにちは、筋肉めがねです。
以前に、以下の2つの記事でtop pageのデザインを変更しました。
そして、今回はtop pageの各記事に対して、タイトルの下に画像が表示されるように変更を加えました。という事で、今回の記事は技術的なお話でございます。
以下、本日の目次です。
各記事のmarkdownファイルでfeatured-imageを設定する。
これは、以下の記事にも書いている内容ですが、ページを行ったり来たりしながらチュートリアルを読み進めていくことは、とても大変ですよね。ということで、同じ内容をもう一度書かせていただきますね。
featured-imageの設定
まずは、gatsby-config.jsファイル内で以下が設定されている事を確認しましょう。
  ...
  {
    resolve: `gatsby-source-filesystem`,
    options: {
      path: `${__dirname}/src/pages`,
      name: 'pages',
    },
  },
  ...
そして、3つのプラグインをインストールします。
npm install --save gatsby-image gatsby-transformer-sharp gatsby-plugin-sharpgatsby-transformer-sharpとgatsby-plugin-sharpについては、gatsby-config.jsファイルで設定されている事を確認しましょう。
plugins: [
  ...
  'gatsby-transformer-sharp',
  'gatsby-plugin-sharp',
  ...
続いて、各記事のフォルダーでfeatured imageを作ります。
記事フォルダーの中にfeatured-image.jpgを作りましょう。そして、記事のマークダウンファイル内に、featuredImageを設定します。
例えば、
...
path: "/posts/transformgatsbytowordpresslike4/"
category: "Gatsby"
tags:
  - "Gatsby"
  - "Wordpress"
  - "Twitter"
  - "Twitter card"
  - "OGP"
featuredImage: ./featured-image.jpg
...これを全ての記事に対して対応させてください。つまり、全ての記事のフォルダー内に”featured-image.jpg”を作り、そしてそれらのマークダウンファイルに、“featuredImage: ./featured-image.jpg”を追加してください。この設定を怠ると、後ほど、gatsby developもしくはgatsby buildした際に、“Cannot read property ‘childImageSharp’ of null”というエラーが表示されます。
続いて、メインのindex.jsxのgraphqlに、新たにfeaturedImageを追記します。
...
frontmatter {
  title
  featuredImage {
    childImageSharp {
      sizes(maxWidth: 630) {
        ...GatsbyImageSharpSizes
      }
    }
  }
  path
  date
  category
  description
}
...
そして、同様にpost-templateにもfeaturedImageを追記します。
...
frontmatter {
  title
  featuredImage {
    childImageSharp {
      sizes(maxWidth: 630) {
        ...GatsbyImageSharpSizes
      }
    }
  }
  ...
この時点で、一旦gatsby developを実行しましょう。
これで、各記事で設定したfeaturedImageのパスが生成されました。
http://localhost:8000/___graphqlで確認してみましょう。

allMarkdownRemark / edges / node / frontmatter / featuredImage / childImageSharp / sizes / srcを左側のパネルで選択し、実行ボタンを押すと、右側のパネルにパスが表示されている事が分かります。
各記事のfeatured-imageをtop pageで使えるように設定する。
各記事のfeatured-imageの設定ができたら、それらをtop pageで使えるように設定して行きましょう。
ブログのtop pageで読み込まれているのはPost componentだという事が分かりますね。
import React from 'react'
import Helmet from 'react-helmet'
import { graphql } from 'gatsby'
import Layout from '../components/Layout'
import Post from '../components/Post'
import Sidebar from '../components/Sidebar'

class IndexRoute extends React.Component {
  render() {
    const items = []
    const { title, subtitle } = this.props.data.site.siteMetadata
    const posts = this.props.data.allMarkdownRemark.edges
    posts.forEach(post => {
      items.push(<Post data={post} key={post.node.fields.slug} />) //この部分でPost componentが読み込まれています。
    })
という事で、Post component内でfeatured-imageを使えるように設定します。
import React from 'react'
import { Link } from 'gatsby'
import moment from 'moment'
import './style.scss'

class Post extends React.Component {
  render() {

    const {
      title,
      date,
      category,
      description,
      //以下、1行追加して、featuredImageを読み込んでいます。
      featuredImage,
    } = this.props.data.node.frontmatter
    ...
先ほど、/src/pages/index.jsxのgraphqlで、featuredImageを設定しましたね。そこで設定したfeaturedImageを、このPost componentで読み込みました。
続いて、同じくPost component内で、featuredImageをfeaturedImgSizeに変換し、featuredImgSizeをタイトルの下に入れます。
const { slug, categorySlug } = this.props.data.node.fields
const featuredImgSize = featuredImage.childImageSharp.sizes.src //この一行を追加

return (
     <div className="post">
          <div className="post__meta">
               <Link to={slug}>
                    <div className="post__meta__title">
                         {title}
                    </div>
               </Link>
               <time
                    className="post__meta-time"
                    dateTime={moment(date).format('YYYY年M月DD日')}
                    >
                    {moment(date).format('YYYY年M月DD日')}
               </time>
               <span className="post__meta-divider" />
               <span className="post__meta-category" key={categorySlug}>
                    <Link to={categorySlug} className="post__meta-category-link">
                         {category}
                    </Link>
               </span>
          </div>

          <div className="post__oreadd">
               <Link to={slug}>
                    <h2 className="post__oreadd__title">
                         <div>
                              //ここで先ほど設定したfeaturedImgSizeを使っている。
                              <img
                              src={ featuredImgSize }
                              width="100%"
                              height="300px"
                              style = {{ objectFit: 'cover' }}
                              />
                         </div>
                    </h2>
                    <div className="post__oreadd__description">{description}</div>
               </Link>
          </div>
          <div className="post__readmore" >
               <Link to={slug}>
                    続きを読む>
               </Link>
          </div>
     ...
これで、Post component内で、featuredImageが使えるようになりました。
一旦、ここでgatsby developを実行してみましょう。
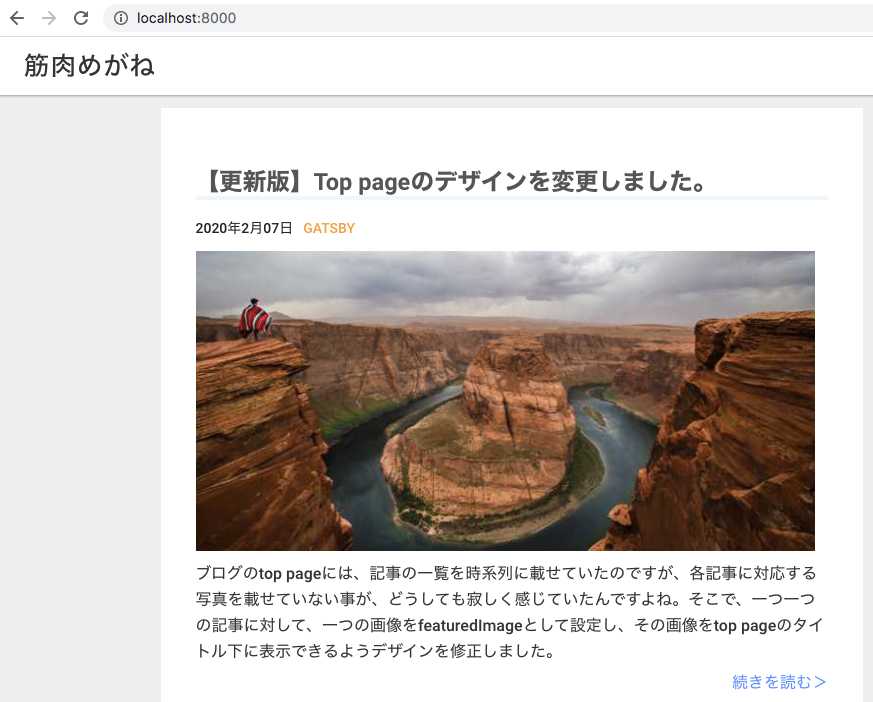
問題なく表示されている事が分かりますね。
では、gatsby buildを実行してみましょうか。
。。。。すると、terminalに以下のエラーが表示されます。
success run queries - 24.321s - 51/51 2.10/s
failed Building static HTML for pages - 3.279s

 ERROR #95313

Building static HTML failed for path "/tags/gatsby/"

See our docs page for more info on this error: https://gatsby.dev/debug-html

> 28 |     const featuredImgSize = featuredImage.childImageSharp.sizes.src
     |                                           ^
  29 |
  30 |
  31 |     return (

  WebpackError: TypeError: Cannot read property 'childImageSharp' of undefined

  - index.jsx:28 Post.render
    src/components/Post/index.jsx:28:43
Cannot read property ‘childImageSharp’ of undefinedというエラーです。
原因は、Post componentが呼ばれているファイル全てにおいて、graphql内でfeaturedImageを定義できていないからなんですね。
先ほど、/src/pages/index.jsx内のgraphqlにて、featuredImageを定義してあげました。
...
frontmatter {
  title
  featuredImage {
    childImageSharp {
      sizes(maxWidth: 630) {
        ...GatsbyImageSharpSizes
      }
    }
  }
  path
  date
  category
  description
}
...
実は、“gatsby-v2-starter-lumen”のテンプレでは、Post componentは、/src/pages/index.jsxだけではなくて、以下の2つのコンポーネントでも呼ばれているんですよね。
import React from 'react'
import Post from '../Post'

class TagTemplateDetails extends React.Component {
  render() {
    const items = []
    const tagTitle = this.props.pageContext.tag
    const posts = this.props.data.allMarkdownRemark.edges
    posts.forEach(post => {
      items.push(<Post data={post} key={post.node.fields.slug} />) //この行でPost componentが呼ばれています。
    })
...import React from 'react'
import Post from '../Post'
class CategoryTemplateDetails extends React.Component {
render() {
const items = []
const { category } = this.props.pageContext
const posts = this.props.data.allMarkdownRemark.edges
posts.forEach(post => {
items.push(<Post data={post} key={post.node.fields.slug} />) //この行でPost componentが呼ばれています。
})
...だから、それぞれのtemplate内のgraphqlにおいて、featuredImageを定義してあげないといけないんです。
tag-template.jsxとcategory-template.jsxですね。
...
edges {
     node {
          fields {
               slug
               categorySlug
          }
          frontmatter {
               title
               featuredImage {
                    childImageSharp {
                         sizes(maxWidth: 630) {
                         ...GatsbyImageSharpSizes
                         }
                    }
               }
...edges {
node {
fields {
slug
categorySlug
}
frontmatter {
title
featuredImage {
childImageSharp {
sizes(maxWidth: 630) {
...GatsbyImageSharpSizes
}
}
}
date
category
description
}
}これで、もう一度gatsby buildを実行してみましょう。
。。。無事に、問題なくgatsby buildが実行できたはずです。
お疲れ様でした。これで、ブログのtop pageにおいて、各記事に画像を1つ貼り付ける事ができましたね。
top pageの画像の大きさの、縦横のサイズを変更する。
最後に、top pageの画像の大きさを少し変更しましょう。これは、imgタグの中にobjectFitというpropertyを定義してあげる事で簡単に解決できます。
objectFitをcoverとしましょう。これは、例えば画像をもう少し横長にトリミングしたい、ただ画像の上部分や下部分だけをトリミングではなくて、高さの中心はそのままキープしたい、という場合について、objectFitをcoverとする事で実現できます。
<Link to={slug}>
     <h2 className="post__oreadd__title">
          <div>
               <img
               src={ featuredImgSize }
               width="100%"
               height="300px"
               style = {{ objectFit: 'cover' }} //これですね。
               />
          </div>
     </h2>
     <div className="post__oreadd__description">{description}</div>
</Link>
以上で、top pageの画像のデザイン変更は完了しました。
まとめ
いかがでしたでしょうか。少しずつ少しずつワードプレスちっくなサイトが出来上がってきております。
今回の記事では、top pageの各記事に対して、タイトルの下に画像が表示されるように変更を加えました。
- 各記事のmarkdownファイルの中でfeatured-imageを設定しました。
- 各記事のfeatured-imageをtop pageで使えるように設定しました。
それでは、本日は以上です。